Monday, May 21, 2012

Improvements and difficulties.


During the process of constructing our geodesic dome we came across a few building difficulties. If we had more time, funds and were able to have another attempt at this assignment, we would have gone about this project in a different approach. We would have looked at using more appropriate, recycled materials, such as recycled wood or looking into buying off cuts, which would have lowered the costs involved in this project.

We could have looked into other construction processes which may have made the final product more water tight and easier to construct. Attaching the plywood to the already constructed skeleton with different angles proved to be the quite difficult. This may have been due to the triangles being slightly out of kilter and not completely in line with each other. This lead to the points of the triangles not meeting properly above the recycled plastic joints, which meant that we had to add extra bits of wood to make sure that these areas would leak.
A solution to this problem could have been to cut and fix the plywood triangles directly to one another without the structural skeleton. A few recyclable materials such as tyres or plumbing tubes may have been a joining material that would have been ideal to keep the joints water tight. This different approach may have made our dome more water proof as well as reducing costs involved in this project.

Water Test


Wednesday, May 16, 2012

Cladding the Dome

<><> <>
<> <><> <>
Cutting the Plywood


Fixing the ply wood to the dome


<><><><>
<> <><><><>
<>
Measuring the Triangles


<><><><> <> <><><><>
<> <><><><> <>
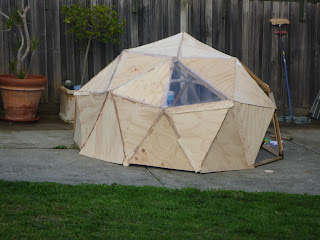
Final product


Once we finished the skeleton of the dome, we moved onto researching what materials would be appropriate as a cladding material. 


An example we would have liked to use as an exterior cladding, which is environmentally friendly, was prefabricated Alucobond Panels. This light weight material can be custom made to desired sizes. It is flexible, weather resistant, shock resistant and easy to install.


We did not use this product for this experiment as it was not readily accessible, and the cost was too expensive to get custom made for such a small scale project. 


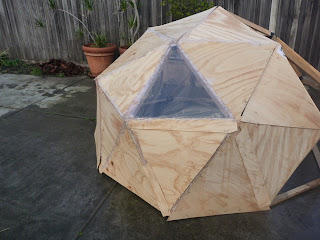
Therefore we decided to use plywood, although not as water tight as Alucobond, we were able to access this product readily and it was cost efficient. 


It provide its purpose for this exercise as proved in the footage.


As we had to provide a window in the exercise, we decided to provide skylights instead. It was going to be very expensive for us to order glass, fibreglass or other products for our skylights. We were able to get a cheap off cut of perspex for our example of this in our geodesic dome exercise.


http://www.compositepanels.com.au/FAQS.htm
http://www.ecospecifier.com.au/products/product-summary.aspx?prodid=3644

Monday, May 7, 2012

The skeleton of the dome


 A close up of a joint between the timber members and the recycled plastic.

Thursday, May 3, 2012

Standing the Dome

After we assembled all five of the pentagons. We had to fix the last two Pentagons together. To do this we had to lift the frame and the curve it into the circular shape we needed.

Alice and Tash fixing the last two pentagons together

Tahnee holding up the frame while Tash and Alice fixed the final Pentagons together


After the last two pentagons where fixed, we then had to make the structure more sturdy by adding timber to the tops of the pentagons. We also need to fixed more timber members to the base for more support but decided to leave it until we have finsihed fixing the top pentagon and the cladding in case we need to access the dome internally.


Final product of the Skeleton for out Dome exlcuding bottom plates in gaps which we will finish later


(Posted by Tahnee Stevens)

Constructing the Skeleton

Our first pentagon


Tash and Hanita screwing the timber to the pipe


Close up


First finished pentagon
We started the process of constructing the skeleton by laying out timber size A in a pentagon shape. Where the timber needed fixing together, we screwed the recycled pipe to the timber using power drills. Timber size B was the used for the internal parts of the pentagon to create the triangles where we fixed the five ends in the centre on an angle. We the repeated this process for the next five pentagons which we fixed to one another. We had to make the five triangles that create the wall joined because the pentagons meet together on the middle two pipe connectors.


(Posted by Tahnee Stevens)
Finished timber and pipe cutting

Cutting the Recycled Piping

Tahnee cutting the recycled piping
We were lucky enough with this project find recycled irrigation piping which we then cut into 40mm thick cynlinders. We estimated that we needed approximately 32 pieces to fix the timber together. We allowed 40 for error.


(Posted by Tahnee Stevens)